User Management Data Import
Data Managers can use the data import process to import user management data.
-
Select Core.
-
Select System tools.
-
Select Data import.
-
Select Create import job.
-
Select the "User management" Category.
These Import types appear:
-
Publishable Custom Field
-
AdminView Custom Field
-
User email
-
Username
-
BBID Username
Warning: If you run a User Management type of Data import job to assign Blackbaud ID usernames, the next login experience for those users will be affected.
Note: When you run the BBID Username Import, it places the BBID into both the Blackbaud ID username field and the Username field. This enables schools to then use the Username field for exports and integrations, even for users who never login with their BBID accounts. This is also true for the Connect to Blackbaud ID function (User profile in Core, Access ) and the bulk Connect function (Core, Security, Blackbaud ID, Authentication, Unregistered). If a username existed before the data import or connection event, then the previous username is copied to the Legacy username field, but only if the Legacy username field was blank at the time of the import.
-
Student ID
-
Languages spoken at home
-
Locker & combination
-
Mailbox & combination
-
Emergency Contacts (Related Users)
-
Emergency Contacts (Non-related Users)
-
Host ID
-
Private/Personal Bio
-
Public/Professional Bio
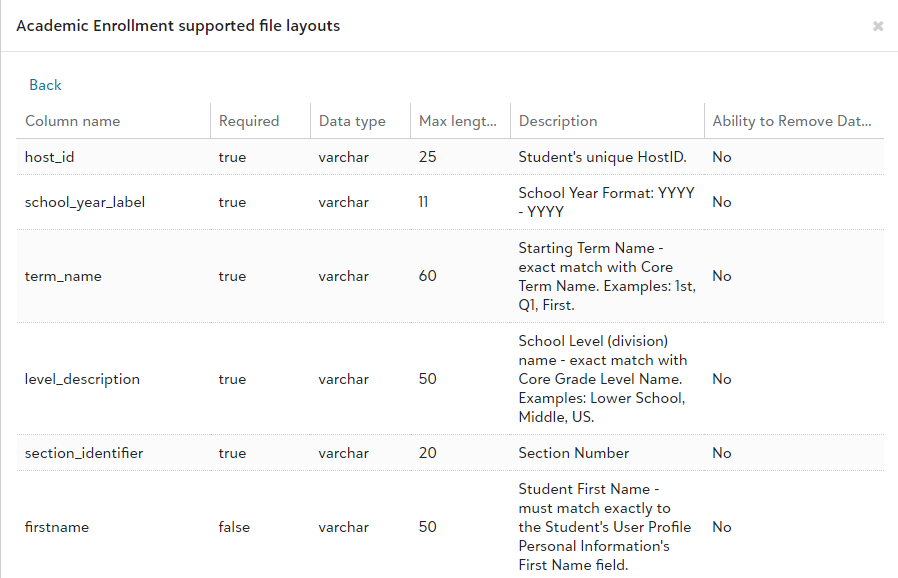
For a list of all import fields, requirements, data types, max length data, descriptions, and information on whether or not you can remove data from the field, open the detailed view screen by selecting the following on the import screen: Category > Import type > View file layout help (under File layout help) > Detailed view. A screen similar to the following displays.
Download Sample Import Layout File
You can view and download sample import files.
-
Select Core.
-
Select System tools.
-
Select Data import.
-
Select Create import job.
-
Select the Category and Import type of the information being imported.
-
Select View file layout help.
-
Select Detailed view to view the file layout fields; select Sample file to download a sample import file from which you can work to create your import file.
Scheme 1
Use Scheme 1 to import publishable custom fields based on the host_id. Required fields are: host_id, firstname, lastname, custom_field_label, custom_field_value.
Scheme 2
Use Scheme 2 to import publishable custom fields based on the user_id. Required fields are: user_id, firstname, lastname, custom_field_label, custom_field_value.
Scheme 1
Use Scheme 1 to import adminview custom fields based on the host_id. Required fields are: host_id, firstname, lastname, admin_custom_field_label, admin_custom_field_value.
Scheme 2
Use Scheme 2 to import adminview custom fields based on the user_id. Required fields are: user_id, firstname, lastname, admin_custom_field_label, admin_custom_field_value.
Scheme 1
Use Scheme 1 to import user email fields based on the host_id. Required fields are: host_id, firstname, lastname.
Scheme 2
Use Scheme 2 to import user email fields based on the user_id. Required fields are: user_id, email, firstname, lastname.
Scheme 1
Use Scheme 1 to import user email fields based on the user_id. Required fields are: user_id, user_name, firstname, lastname.
Scheme 1
Use Scheme 1 to import BBID user name fields based on the host_id. All fields required.
Scheme 2
Use Scheme 2 to import BBID user name fields based on the user_id. All fields required.
Scheme 1
Use Scheme 1 to import student ID fields based on the host_id. Required fields are: host_id, student_id, firstname, lastname.
Scheme 2
Use Scheme 2 to import student ID fields based on the user_id. Required fields are: user_id, student_id, firstname, lastname.
Scheme 1
Use Scheme 1 to import fields based on the host_id. Required fields are: host_id, firstname, lastname, language.
Scheme 2
Use Scheme 2 to import fields based on the user_id. Required fields are: user_id, firstname, lastname, language.
Scheme 1
Use Scheme 1 to import locker and combination fields based on the host_id. Required fields are: host_id, firstname, lastname, locker_nbr.
Scheme 2
Use Scheme 2 to import locker and combination fields based on the user_id. Required fields are: user_id, firstname, lastname, locker_nbr.
Scheme 1
Use Scheme 1 to import mailbox and combination fields based on the host_id. Required fields are: host_id, firstname, lastname, mailbox_nbr.
Scheme 2
Use Scheme 2 to import mailbox and combination fields based on the user_id. Required fields are: user_id, firstname, lastname, mailbox_nbr.
Note: All imported contacts will be marked as active.
Scheme 1
Use Scheme 1 to import emergency contacts based on the users' name. Required fields are: firstname, lastname, grad_year, contact_firstname, contact_lastname, phone_number, phone_type, sort_order.
Scheme 2
Use Scheme 2 to import emergency contacts based on the users' host ID. All fields required.
Scheme 3
Use Scheme 3 to import emergency contacts based on the users' user IDs. All fields required.
Note: All imported contacts will be marked as active.
Scheme 1
Use Scheme 1 to import emergency contact phone information for unrelated users based on the host ID. Required fields are: host_id, firstname, lastname, contact_firstname, contact_lastname, relationship, phone_type, phone.
Scheme 2
Use Scheme 2 to import emergency contact phone information for unrelated users based on the user ID. Required fields are: user_id, firstname, lastname, contact_firstname, contact_lastname, relationship, phone_type, phone.
Scheme 3
Use Scheme 3 to import emergency contact email information for unrelated users based on the host ID. Required fields are: host_id, firstname, lastname, contact_firstname, contact_lastname, relationship, email.
Scheme 4
Use Scheme 4 to import emergency contact email information for unrelated users based on the user ID. Required fields are: user_id, firstname, lastname, contact_firstname, contact_lastname, relationship, email.
Scheme 1
Use Scheme 1 to import new host ID fields based on the host_id. Required fields are: host_id, firstname, lastname, new_host_id.
Scheme 2
Use Scheme 2 to import new host ID fields based on the user_id. Required fields are: user_id, firstname, lastname, new_host_id.
Scheme 1
Use Scheme 1 to add, update, and delete private or personal bio content on a user record based on the host_id. Required fields are: host_id, firstname, lastname, bio.
Scheme 2
Use Scheme 2 to add, update, and delete private or personal bio content on a user record based on the user_id. Required fields are: user_id, firstname, lastname, bio.
Scheme 1
Use Scheme 1 to add, update, and delete public or professional bio content on a user record based on the host_id. Required fields are: host_id, firstname, lastname, bio.
Scheme 2
Use Scheme 2 to add, update, and delete public or professional bio content on a user record based on the user_id. Required fields are: user_id, firstname, lastname, bio.