Advanced Lists
Platform managers and List managers can create advanced lists to query their database without the constraints of basic lists or SKY lists. Advanced lists can be accessed from Reporting then select Manage lists followed by Manage basic and advanced lists. Advanced lists can seem overwhelming and frustrating for some users but this tutorial will walk you through a common list query. If you feel comfortable with advanced lists, you can find our documentation on advanced lists here. However, if you are looking for some guidance on creating an advanced list, take a look at our example below.
Tip: When you are creating your advanced list, you will want to save your list as you work through it. If you wait to save your list until the end, the system may time out and you will lose your work. You will need to select at least one Display field in order to save your list.
Query: I need to see all families with all family members on a single line.
When you are thinking of your list query, you should think about two things:
-
Who do you want to include?
-
What information do you want to see about these users?
Looking at our example, we know we want to see all families and each family should be on one line in our list. Typically, when you are creating this list, you are looking for Students with their families so we will be building this list based on that assumption. In addition, schools are usually using this list to view and contact Parents so we're going to build this list to show students with their parents.
Create your list
When you create your advanced list, you will first need to provide a Name, category, and description for your list. Use these fields to make your list easily identifiable for you and other users when searching your advanced lists. For this list, we might use:
Name: List of students with their families(one line)
Category: Constituent information
Note: Categories are created by the school and lists can be filtered by category.
Description: List of students with their families(one line)
Tip: When you are searching for lists that are on one line, they may also use the word Flattened in the description.
Determine your objects
Each object connects to a table or pieces of information in your database. This may include fields or information calculated from other fields. You can add objects to your list under Select Objects. For our query, we need the following information:
-
User
-
Relationship
-
Role
Select your objects
The first object you need to add is User Base which can be found under Constituent Information, your other objects will be nested under the User Base object once selected. You will then want to add:
-
User Role: This will allow us to filter our list for just users with the Student role.
-
Parent/Child Relationship: This will be used to connect the Student(User Base) to their Parent(User Base [1]).
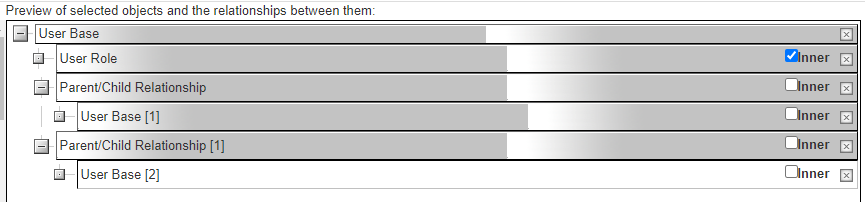
Once you have added the Parent/Child Relationshipobject, you will want to add another User Base object, this will become User Base [1].
User Base [1] should be nested under Parent/Child Relationship:

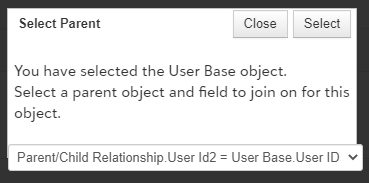
When you have selected User Base under Constituent Information, you will need to select the parent object and field for the User Base object to join on. In this case, your Parent object will be Parent/Child Relationship and the field will be User.Id2. From the available dropdown, you will want to select:
You will need to add the Parent/Child Relationship and User Base objects for each Parent you would like to include on your list. Although many families only have two Parents, you may want to add additional Parent/Child Relationship and User Base objects to your list to include step-parents or Grandparents. Just remember when you are selecting your parent objects, the parent object for your Parent/Child Relationship object will always be User Base.User ID = Parent/Child Relationship.User Id1:
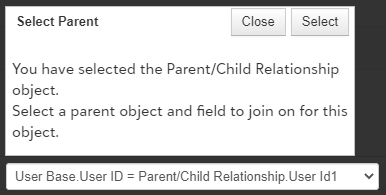
This will define which user information will be tied to User Id1 in the Parent/Child Relationship. By tying this to the User Base.User ID, we are defining User Id1 as the Student.
Note: You will need to add additional filters when including Grandparents.
If you are only including two Parents in your list, your objects should look like this:
Inner vs outer joins
Once you've added your objects, you will need to setup your inner and outer joins. By default, the inner join is selected for each object. The difference between an inner and outer join is:
-
Inner: Query will only return results that have both objects in common. This means if an inner join is selected for an object, any selected fields associated with that object are considered required. For example, if you select the inner join for the User Address object, any users in your query will have address information in the system.
-
Outer: Query will return results from either object. If the inner join is not selected for an object, fields selected for that object are not required and users without information in the selected field will be included in your results.
In our example, you will want to remove the inner joins for all your objects expect the User Role object. This is because we want all users listed under User Base to have the same role(Student). We do not want the inner join selected for any of the Parent/Child Relationship or User Base objects because not all students will have the same number of Parents so we do not want to make any of the Parent/Child Relationship or User Base objects required since this would remove some students from our list.
Display fields
Each object you add to your list is connected to a table of data in the system. Display fields are used to select the information from those tables to display on your list. You can select to display any field in any of your selected objects.
Select your display fields
From Display fields, use Select fields to view the objects you have added to your list along with the associated fields for each object. You will need to expand each object to view its available display fields.
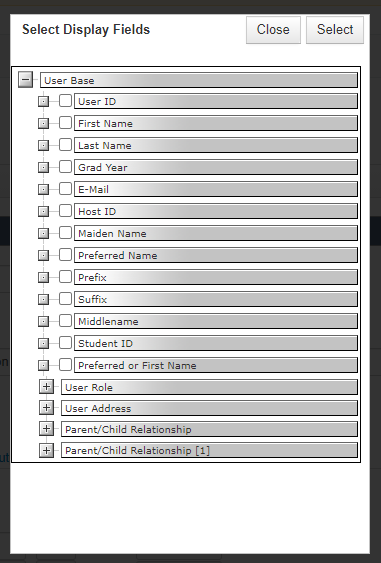
Use the available checkboxes to select the fields you would like to see in your list and then select Select to close out Select Display Fields. Once you have added your display fields to your list, you can use a Sort order to sort your display fields as needed. In addition, you can use the Display as field to rename the columns in your list. For example, instead of User Base.First Name, you might have Student First Name.
Enable grouping options
Enable grouping options allows you to remove some duplicates from your list without adding additional filters. Once you have selected to enable grouping options, you will see the Grouping column with Group by set for each display field. When Group by is selected, if the values in the display field are the same, the fields will be merged. This selection will remove all true duplicates from your list.
For example, let's say you want to make a list of students with their First name, Last name, and City. Once created, you run your list and you see many duplicates for each student even though the information in each row is the same. This occurs because some students will have more than one address in the system. Even though the City field for those addresses may be the same, the information in the other fields(such as Address line 1) are different. These fields are causing your list to show these duplicates even though they are not displayed on your list.
Note: Duplicates can also be removed using filters, but we recommend selecting Enable grouping options for all your lists.
Set your filters
Next, you will want to set the filters for your list. Your filters will filter your objects to only include data that meets the criteria of your list.
Global vs object filters
When you create your filters, you can add Global filters(Where clause) and/or Object filters(join clause). In most lists, you will be adding a filter under each option. The difference between these filters is:
-
Global filter: Filters by a specific value in the list to identify a particular object or objects. Global filters will eliminate blank values.
-
Object filter: Can only be used with objects with an Outer join. Object filters do not eliminate blank values.
Add your filters
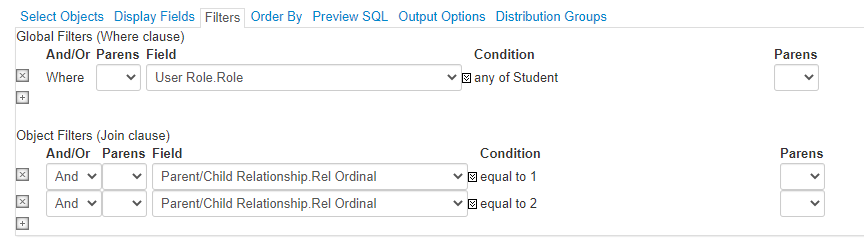
If we think back to our example, we are looking for Students with their Parents and we want all their information on one line. To do this, we need to use both Global and Object filters. Your Global filter will be:

We are filtering our list to only show users with the Student role. Since the User Role object is attached to your first User Base object, only Student information will appear in these User Base object fields.
Next, you will use your Object filters to flatten your list. In order to flatten this list, you will need to use the relationship ordinal field to organize the parent/child relationships by when each Parent was added to the student's profile as a Parent. For example:

This filters the Student's parent/child relationships for the first Parent added to the Student's profile. That parent's information is included in the User Base[1] object that is nested under the Parent/Child Relationship object.
You will want to add a filter for each Parent/Child Relationship object you have added to your list. If you are only including two Parents in your list, your filters should look like this:
Add additional information
At this point, our list will only show basic user information for Students and Parents such as their Name, User ID, Grad Year, and email. Typically schools want to use lists for a way to contact users or view specific set of users. Let's take a look at some of the common modifications you might make to this list:
Tip: If your list returns no results after adding additional objects, please make sure the inner join is not selected for the object. Remember, your inner joins are telling the system the user has to have that information in their profile in order to appear in your list.
Address
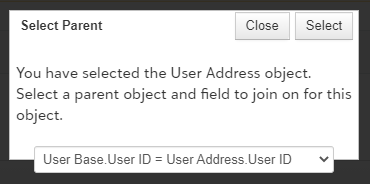
If you need to include Student address information in your list, you will need to add the User Address object to your selected objects. This can be found under Constituent information. For student addresses, when you add your User Address object to your list, you'll want to select the following for the parent object:
Once the User Address object is added to your list, you can use Display fields to add the address information you would like to include on your list.
When you preview or run your list, you will most likely see duplicates since Students can have more than one address in the system. You can flatten your list by adding an Object filter to your list to specify which address you would like to see here. Typically, schools are looking to include the Home address for students so they would want to add the following filter:

In addition, you can easily add additional addresses to your list by adding more User Address objects under User Base. If you do add additional addresses, you will want to add Display fields for the new User Address object and add additional filters to flatten your list. For example, to include the Home 2 address for students, you'll want to add the following filter:

Phone
You can add phone numbers to your list using the User Phone object. Much like with the User Address object, you will need to associate the User Phone object with User Base.User Id, if you are looking for student phone numbers. You can also get rid of duplicates from your list by adding a filter for the specific phone type such as:

Additional User Phone objects and filters can be added as needed.
Siblings
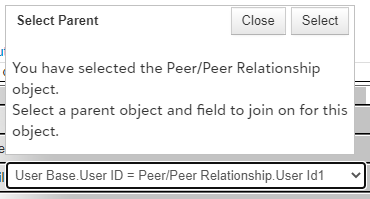
Siblings can be added to your list using the Peer/Peer Relationship object. This can be found with the rest of the Relationship objects under Constituent information. Once you select to add this object, you will need to select your parent object:
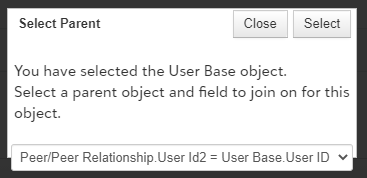
Once you have added the Peer/Peer Relationship object, you will need to add a User Base object which will be nested under the Peer/Peer Relationship object and linked to the second User ID for this object. This means you will want to select:
Use Display fields to select any fields you would like to display for siblings in your list.
Finally, you will need to add a filter for the Peer/Peer Relationship object. Unlike with the Parent/Child Relationship, we need to use the Description 1 field to filter for just siblings. If you were to add a Peer/Peer Relationship object filter to your existing list, your filters would look like this:
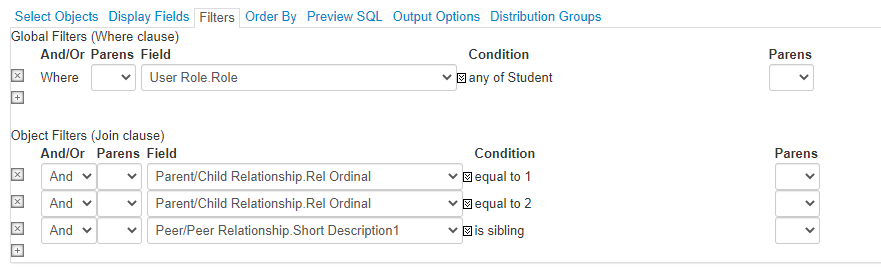
You can repeat these steps for each sibling you add to your list. Just remember, if you add more than one, you will need to use the Peer/Peer Relationship.Rel Ordinal field to flatten your list.
Students with specific grad year
It is very easy to filter your list by graduation year. The Grad year field is included in the User Base object so you simply need to add the following Global filter:

You can replace 2022 with any other graduation year in your system. You will simply need to select the Grad year from the available list when you add your filter.
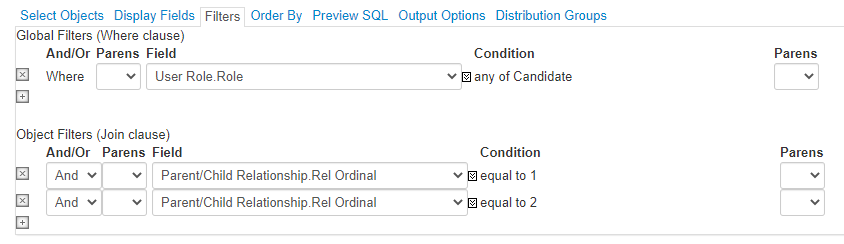
Families of Candidates or Incoming students
Our final modification is the easiest to make. We can easily change this from a list of Students with their families to Candidates or Incoming students. Although these are the most common roles you will be making a list for, you can use the User Role object to filter your list for any role. For example, for a list of Candidates with their Parents, your filters would be:
Tip: When adding roles to your filter, hold down Ctrl to select more than one role.
Preview list and List templates
Preview your list
You can use Preview to preview your list as you build it. You may want to preview your list after you make any changes to it. You should never wait until you have completed your list to preview it because it will be difficult to figure out where you went wrong when building it. If you preview it after any new objects or filters are added, you will know right away if you have made a mistake and where you made your mistake.
List templates
List templates are pre-defined lists that can be used as a starting point for many of the advanced lists you create. List templates are arranged by category and you can view a brief description of each template from the List templates page. You can copy a list template to modify it for your school as needed.