Topics and Topic Sharing
Tip: For a visual overview, make sure to check out our feature video.
Topics provide a dynamic way to organize and share learning resources with students
While bulletin boards are useful for
Tip: For information on the differences between Bulletin boards and Topics, see Bulletin Boards versus Topics.
In the Faculty persona, Topics are available for Classes, Advisories, Activities, Dorms, and Community groups. Students can also see published Topics from their class and group pages. Parents can also view Topics if
Note: Group leaders won't see Topics until at least one has been created. Once one Topic is published, the members of the group will then see Topics.
To edit the publish and expire dates, the cover image, topic name, or layout:
-
Select the edit icon in the topic.
-
Select Setup, then Edit Settings.
-
Make the necessary changes, then select Save.
After creating a new Topic, it displays on the class Topics tab. Opening the Topic displays only a blank page with a Back button because no content has been added to the Topic yet. So let's add some content.
Select the edit icon to open the Topic design view. Here, select Setup, then Edit Settings to modify the page layout and the general information you added when creating the Topic. You can also share the Topic with a class section or add it to the Topic Bank.
Select Layout to access the canvas and add content to display in your Topic. Simply drag an item from the left column to the canvas on the right, placing the content tile where you want it to display. As you add content, select Preview Topic at any time to view the Topic.
The following content and Materials are available to add:
-
Cover Brief: Display the description information added when the topic was created.
-
Cover Image: Display the cover photo added when the Topic was created. To change the photo, select the edit icon.
-
Cover Title: Display the Title added to the Topic when it was created. Select the edit icon to edit the Title.
-
Discussion: Creates a space for group members to comment and discuss the topic.
-
Assignments: Display assignments relevant to the Topic in one place for students to easily access them. Drag the Assignments widget to the canvas, then select the assignments to include. Once the Assignments widget is added to the Topic, select the edit icon to modify which assignments are included. For more information, see Assignments in Topics.
-
Note: You cannot create assignments from a Topic. Create the assignments first, then add them to the Assignments widget on the Topic.
-
Tip: If you notice that an assignment is not displaying in the Topic, check that the assignment is published for all class sections sharing the Topic. If a Topic is shared by two class sections, but an assignment is only published for one of those sections, the assignment will not display in the Topic until it is published for both sections.
-
-
Audio: Display audio files for students to listen to. Drag Audio to the canvas, enter an Album Title and optional Description, then choose the audio files to upload from your computer or device. Enter a Title and optional Caption for each audio file. Select Edit Thumbnail to choose a thumbnail image and set one of the thumbnails as the cover for the audio album.
-
Downloads: Display files that students can download, such as documents or Google Drive files. Drag Downloads to the canvas, then choose the download file from your computer, device, or Google Drive. Enter a Title for the download and optional Description, then Save. To add additional files to the same Downloads content tile, select the add icon. Select the organize icon
 to sort and categorize multiple files within a single Downloads tile on the Topic. You can also add multiple Downloads tiles to the Topic.
 -
Learning Tools: Display a Learning Tool, if applicable.
-
Links: Display links for students to access. Drag Links to the canvas, enter a Title, URL, and optional Description. You can also add an optional Photo and Hover Photo. After saving, select the gear icon to manage how the link is displayed, as a Title, an Image, or a Title and Image.
-
Tip: Drag additional Links to the canvas to add multiple links.
-
-
Photos: Display a photo album. Drag Photos to the canvas, enter an Album Title, and upload photos from your computer or device. You can enter an optional Caption for each photo. To delete a photo from an album, select the Delete checkbox and Save.
-
Text: Drag Text to the canvas and enter the text to display.
-
Videos: Display a video album. Drag Videos to the canvas, enter an Album Title, and upload videos from your computer or device. You can edit the Title for each video and enter an optional Caption, as well as choose the video thumbnails and set one of the thumbnails as the cover for the video album.
-
Tip: Videos may take a few minutes to upload and will display as Currently Processing... until the upload is complete.
-
-
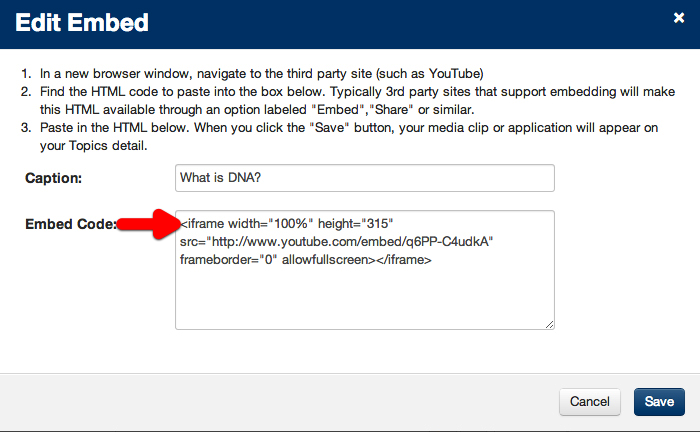
Embed: Display embedded content from a third-party site, such as YouTube.
Tip: When you first embed a video in a Topic, you may notice that the video extends beyond the border of the column, especially when you adjust the width of the page. To correct this, enter width="100%" in the embed code and the width of the video will automatically adjust according to the width of the column.
-
Horizontal Line and Spacer elements are available to further customize your Topics.
Note: Topics and Bulletin boards support LaTeX mathematical symbols. When using LaTeX in our system, please remember you need to use double dollar signs on either side of the LaTeX commands($$ LaTeXContent $$). Group leaders can also add downloads from their Google Drive.
Publish Settings
In the content tiles, select the gear icon to manage the publish settings for that specific content tile. For example, select the gear icon in a Photos tile to set the tile to Published, Unpublished, or Published during range.
This allows you to customize the order in which Topics appear on the page. Simply drag and drop each topic to place them in an order that works best for you.
If you have a long list of Topics already, select Top to automatically move that topic to first on the list.