Attendance Setup Guide
This tutorial will walk you through the steps of setting up attendance categories, setting record methods, and enabling attendance. For a tutorial covering the entire scheduling process, see The Scheduling Guide.
Before you start
Before you set up attendance for a school year, you will need to publish the school year, generate a master schedule, and generate a student schedule.
Publish the school year
Core > Settings > School information > Years & terms
School years refer to the dates when classes are in session. For example, the School Year for classes that begins in Fall 2022 and ends in Spring 2023 is the 2022-2023 School Year.
Before you begin setting up attendance for a school year, a Platform Manager at your school will need to create and publish a school year by setting Is Published is set to Yes.
For more information, see the help topic Years and Terms, .
Generate Master Schedule
Academics > Scheduling > Requests and schedules
Before the school year begins, schedule managers need to create schedules, handle course requests, and resolve schedule conflicts for current and future students. The Generate Master Schedule tool allows them to automate parts of the process and make adjustments as needed.
For more information, see the help topic Generate Schedules or go to Step 4 of the The Scheduling Guide.
Generate Student Schedule
Academics > Scheduling > Requests and schedules
Once your master schedule is in place, use Generate Student Schedule to place students in their scheduled sections.
For more information, see the help topic Generate Schedules or go to Step 6 of the The Scheduling Guide.
Create attendance categories
Academics > Attendance > Attendance setup > Attendance categories
When faculty members go to take attendance, they will see a number of options for the types of absences and tardies they can mark for a student. As an attendance manager, you can create and customize these categories, including virtual attendance categories for distance-learning and hybrid courses.
Create categories
1. Select + Add Category.
2. Enter a name under Category (such as Absent Excused, Absent Unexcused, Tardy Excused, or Tardy Unexcused).
3. Set the category to Active if you would like to make it available right away.
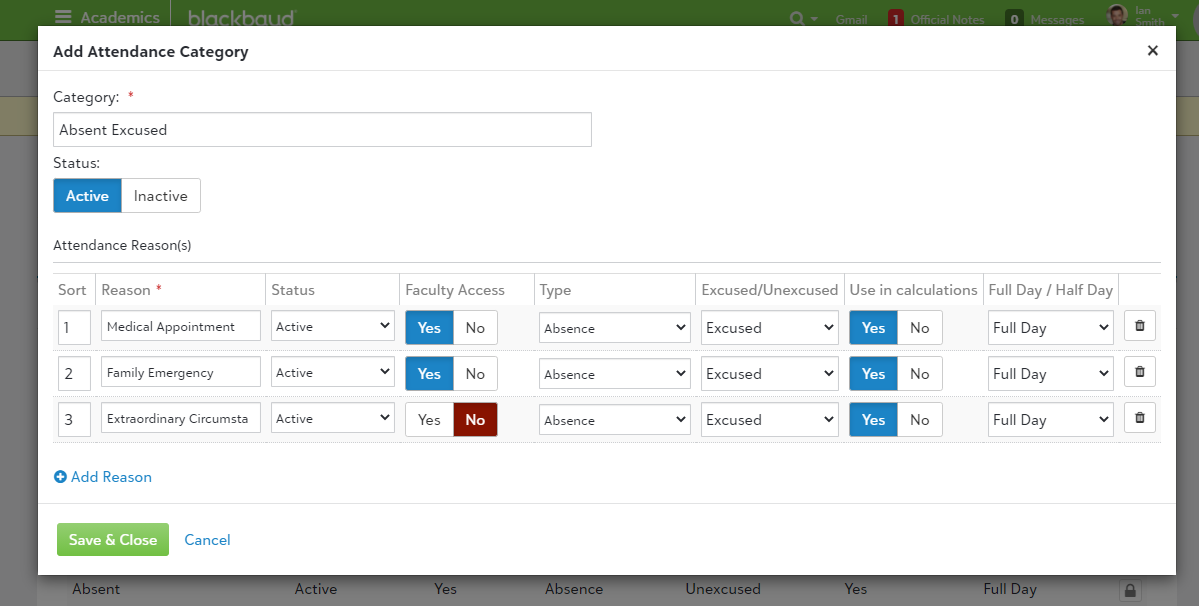
4. Add some reasons under Attendance Reason(s). Use the following fields:
-
Sort: Determines the order in which reasons will appear in menus. Smaller numbers appear higher on menus.
-
Reason: This will appear as an option for faculty to select underneath the Category.
-
Status: Choose Active or Inactive to determine whether this Reason will be available for employees taking attendance.
-
Faculty Access: Determines whether faculty members will be able to choose this Reason. You may choose to leave some Reasons only available to administrators.
-
Type: Choose Absence, Tardy, or Virtual.
-
Excused/Unexcused
-
Use in calculations: Determines whether this field contributes to the Day Equivalency calculation.
-
Full Day / Half Day: This feature is not fully functional yet. Your selection will not affect daily absence counts.
5. Select + Add Reason as needed to add more Reasons.
6. When you are finished, select Save & Close.
Optional: Create virtual categories
By default, every school has a single Present attendance type that can apply to any course. If you want to enable teachers to designate that a student attended class virtually, add a new attendance Category and create an attendance Reason with the Type marked Virtual.
Your school might choose to add a new Category (for example, “Virtual”) containing just one Reason (for example, “Attended Virtually”). Optionally, if you would like to add options for marking students absent or tardy from virtual classes, you can add more Reasons to the virtual attendance category and give them relevant names (“Virtual - Absent,” “Virtual - Tardy,” etc.).
Note: Virtual absences and virtual tardies are not their own attendance Types, so you will use the regular Absence and Tardy Types to create these Reasons.
1. Select + Add Category to open the Add Attendance Category dialog.
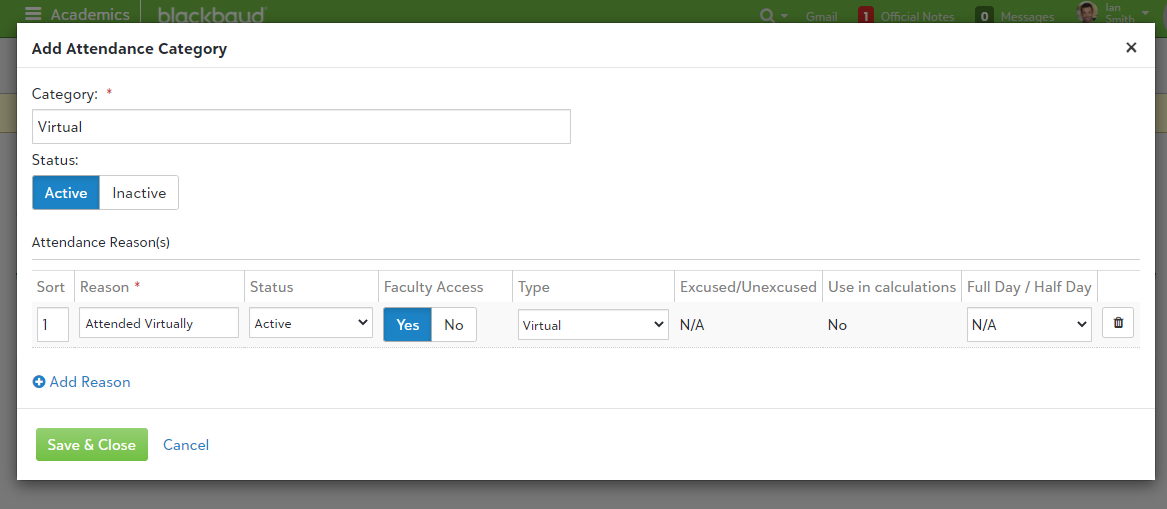
2. Under Category, enter a name.
3. Set the Status to Active if you would like to make this category available immediately.
4. Under Attendance Reason(s), enter a name. This is the menu option that employees will see when they take attendance.
5. Set Faculty Access to Yes if you would like to make a Reason available for teachers to select when taking attendance.
6. Set the Type to Virtual.
Note: The Virtual attendance type is separate from the Present attendance type, but it functions in a similar way. When you select Virtual, the following settings are automatically applied to the Attendance Reason: Excused/Unexcused is set to N/A, Use in calculations is set to No, and Full Day / Half Day is set to N/A. These settings cannot be modified.
7. Select Save & Close.
Set record method
Academics > Attendance > Attendance setup > Record method
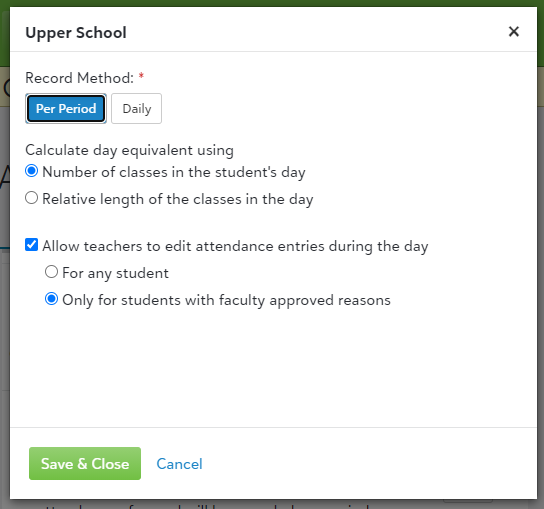
Once you have set up attendance categories and reasons, you will need to determine whether attendance is recorded at multiple points throughout the school day (Per Period) or at one point during the day (Daily).
The chosen Record Method will impact the Class Attendance Lists and Day Attendance Lists. The Record Method also affects the way the system calculates a student's Day Equivalent, a figure that gives Attendance Managers an understanding of how much of a day a student missed in a day.
Once you are on the Record method page, select a School Year using the dropdown menu. If your school has multiple levels, all available levels for that school year will appear below.
Find the appropriate school level and select Edit. Here is where you choose whether to record attendance Per Period or Daily.
Per Period
If your school takes attendance in every class, select Per Period.
|
1. Selecting Per Period reveals the following options:
|
|
2. Optional: Select Allow
-
For any student: A
-
Only for students with faculty approved reasons: A
3. Select Save & Close.
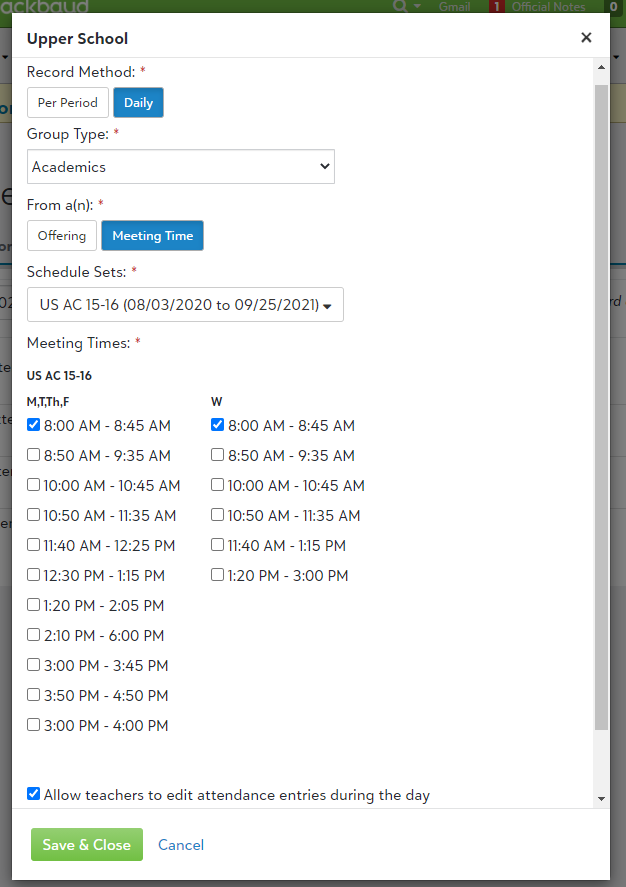
Daily
If your school will take attendance once per day, select Daily.
|
1. Under Group Type, choose one of the following: Academics, Activities, or Advisory. Note: Athletics absences do not contribute to the Day Equivalent calculation. 2. Under From a(n), select Offering or Meeting Time.
Note: By selecting an Offering or Meeting Time, you are indicating when an employee will take the Attendance of Record for the day. Instructors in other course offerings or meeting times are still able to take attendance, but their attendance records will not affect a student's attendance record calculations. |
|
3. Optional: Select Allow
-
For any student: A
-
Only for students with faculty approved reasons: A
4. Select Save & Close.
For more information, see the help topic Attendance Record Method.
Enable attendance
Once you have created attendance categories and reasons, you will need to turn on attendance for each course, team, advisory, or activity where you want attendance to be taken.
Enable Academic attendance
Academics > Scheduling > Requests and schedules
Most schools decide whether to take attendance while using the + Add Course feature to create a course. For information on creating departments and courses, see the help topic Departments and Courses .
If you would like to enable attendance for an academic course that does not currently have attendance enabled, follow these steps:
|
1. Select the dropdown arrow ( > ) beside the name of a department to view the courses within that department. 2. Select the pencil icon beside a course name to edit course details. 3. Scroll down to the Record attendance menu and select Yes. 4. Select Save & Close. Faculty members will now be able to take attendance for all sections of this course. |

|
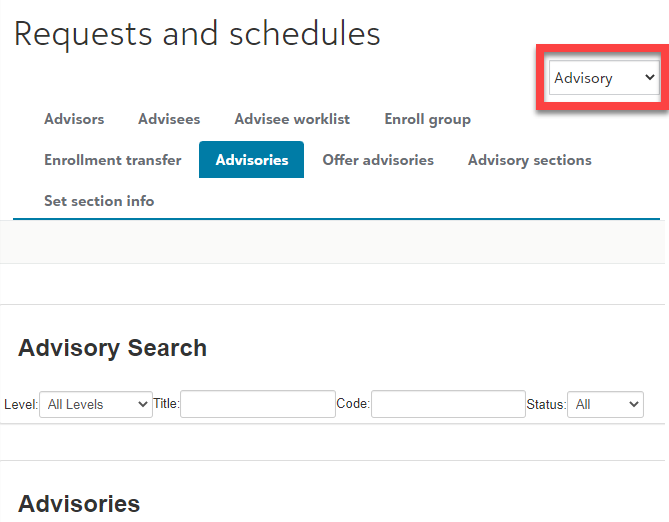
Enable Advisory attendance
Academics > Scheduling > Requests and schedules
The head of an advisory section can take attendance. For information on enabling attendance while creating a new advisory, see the help topic Advisories .
To enable attendance for an existing advisory, follow these steps.
|
1. Find the dropdown menu near the top right of the Requests and schedules page, above the names of the tabs. Change the selection from Academics to Advisory. 2. Open the Advisories tab. 3. Use the filter options to find an advisory, then select Edit. 4. In the first column, find the Record Attendance option and select it. 5. Select Save & Exit. The head of this advisory can now take attendance. |
|
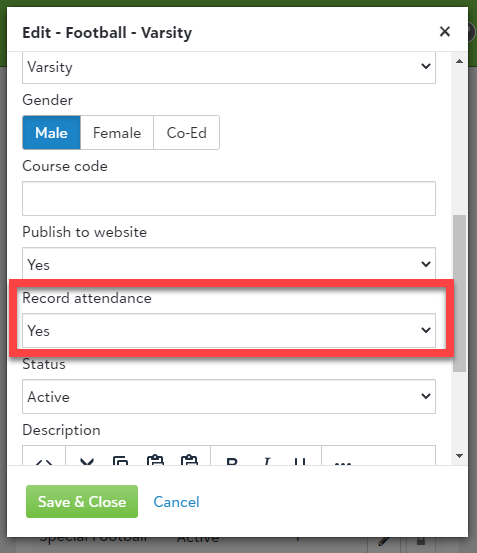
Enable Athletic attendance
Extracurricular > Athletics > Athletics setup > Sports & teams
Note: In order to enable Attendance for a Team, you will need to create your teams.
|
1. Select the name of a sport to view the teams within the sport. 2. Select the pencil icon beside a team name to edit its details. 3. On the General tab, find the Record attendance option and select Yes. 4. Select Save & Close. Coaches can now take attendance for this team. |
|
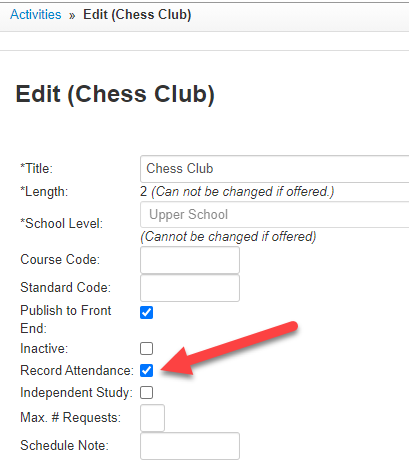
Enable Activity attendance
Extracurricular > Activities >
|
1. Find an activity and select Edit. 2. In the first column, find the Record Attendance option and select it. 3. Select Save & Exit. Attendance can now be taken for this activity. |
|