The Scheduling Guide
Schedules are generated on a yearly basis and provide schools with the means for communicating student schedule information to students, parents, and faculty.
In this guide, you will explore the requirements for creating both the Master Schedule and Student Schedules. This guide will cover using Generate Schedules, which is a semi-automated process for formulating the Master Schedule and Student Schedule based on pre-established parameters. Additionally, manual schedule creation will also be covered.
Course requests must be finalized in order to schedule students. Click here to review our course request guide.
Note: Looking for a hands-on course that teaches all the basics covered in this guide? Enroll in our Blackbaud University course today!
Core Pre-Configuration Checklist
The Core Pre-Configuration Checklist section helps guide Platform Managers through the preliminary steps involved in preparing for the Scheduling process.
Note: Required Roles: Platform Manager
Scheduling Term Definitions
|
Course
A course contains configuration settings that determines how a class is scheduled. English I, Physics, and Algebra, are examples of courses that can contain parameters governing how they are scheduled. A course, in essence, does not explicitly refer to what appears on a finished schedule, but refers to the specifications for how the schedule is created. |
Class / Section
A class or section is an instance of a course. A course may have one or more sections. Each section may occur at different times in different rooms with different teachers. Sections are what appear on a schedule and are necessary in order to create student schedules. |
Block
Blocks are time-based containers that sections occur in. A block occurs at a defined time each day, and during that time, multiple course sections can meet. |
Scheduling
Scheduling generally refers to the functions performed by Generate Master Schedule and Generate Student Schedule. Each function is purposed with helping to automate schedule creation and student placement. |
Publish the School Year
Core > Settings > School Information > Years & Terms
|
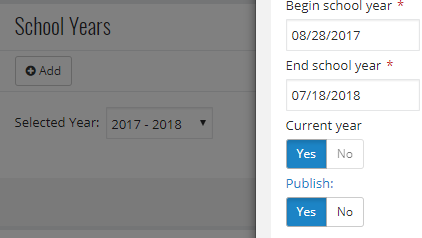
School Years refer to the terms and timelines in which classes are in-session. Each academic year will have a School Year. For example, the School Year for classes that begin in Fall 2017 and ends in Spring 2018 is the 2017-2018 School Year. School Years are created and published by Platform Managers. Publish the School Year for the period you will create a schedule for.Tip: Read more about Terms and School Years |
|
Create Blocks
Academics > Scheduling > Schedule outline > Blocks
|
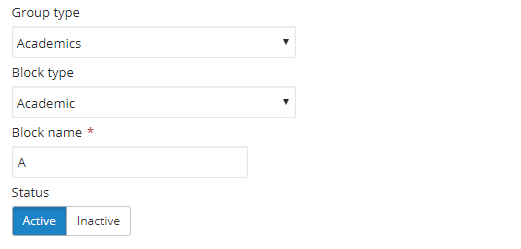
Blocks are segments of time in which course sections are scheduled. For example, A, B, C, D, E, F might refer to 6 blocks. In each Block, a course section will occur. Course sections might appear 3 times in a single block, for example, but with different teachers and rooms. Blocks are later associated with Meeting Times and Schedule Sets to determine the times and sequence in which they may occur on certain days. Blocks are created by Academic Group Managers. Create each block required in your schedule. Blocks for Lunch and Breaks should also be considered. Tip: Read more about Blocks |
Create Building and Rooms
Core > Settings > School information > Buildings
|
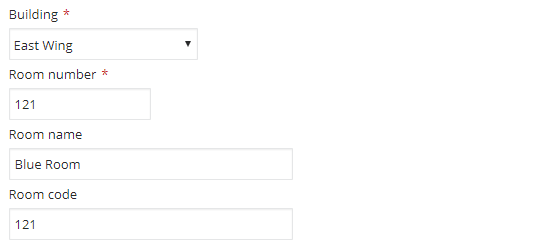
Buildings and Rooms determine the locations in which courses occur. They both communicate location information and determine several additional factors, including:
Buildings and Rooms are created by Platform Managers. Create rooms for each area a course will occur within a building, determine the maximum number of students that should be scheduled in that room, and associate each room with a type to ensure specific classes are scheduled in corresponding rooms. These fields are used by Scheduling to automatically associate course sections with rooms. Tip: Read more about Buildings and Rooms |
|
Determine Scheduling Preference
Academics > Scheduling > Requests and schedules

|
Scheduling Preference refers to the emphasis given to each department’s assignment to certain rooms and buildings over one another. Departments with a lower number (ex. 1) will be scheduled before departments with a higher number (ex. 2). This results in better scheduling availability options for departments that are scheduled first. Tip: For departments with courses that are often paired with another course (ex. Science with Science Lab), consider giving those departments (ex. Sciences) a lower number to ensure they get the best possible scheduling scenario. Department scheduling preference is set by a Platform Manager. Set the priority for each department to determine in what order courses are scheduled, with 1 as the highest priority and 10 as the lowest priority. Tip: Read more about Department Scheduling Preference |
Course Configuration
Academics > Scheduling > Requests and schedules > Departments & courses
Courses contain configuration options pertinent to maintaining scheduling precision. Each factor is influenced by parameters you select when you Generate the Master Schedule:
Tip: To maximize success, fill out all information under each course's Schedule tab.
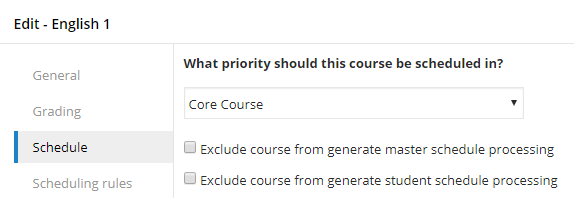
Course Priority CategoryCategories work in the same way department scheduling does; certain categories can have a higher or lower priority than others. Therefore, this allows courses to have higher scheduling preference over others within a department. For example, assume there are two Course Priority Categories: Core Courses and Electives. If Core Courses are given a higher priority over Electives, than Core Courses will be scheduled before Electives. Courses with the same priority are scheduled in order depending on department priority and the number of sections. Read more about Class scheduling order. To create and modify course priority levels, modify the Course Priority table. Courses can also be excluded from the Generate Master Schedule and Generate Student Schedule processes. Exclusion may be ideal for manually enforcing courses that must occur within specific timeslots. |
|
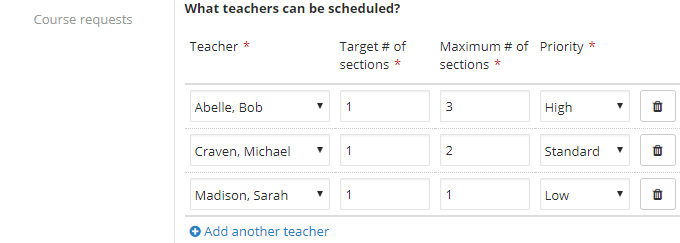
Teacher SchedulingCourses can be associated with specific teachers. Teachers can also be allotted a maximum amount of sections to teach. Lastly, teachers can have a Standard, Low, or High priority. Priority results in High priority (1) teachers being scheduled before others with Standard (2) and Low (3) denominations. |
|
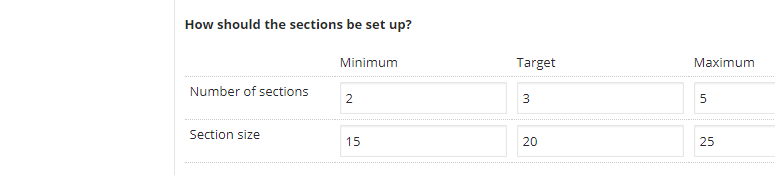
Course SectionsSections refers to the available instances of a course in the schedule. A course with 3 sections equates to three separate instances of a course occurring at the same or different times in the same or different blocks.
The Minimum, Target, and Maximum fields correspond with the Section size and Number of sections fields. For example, what is the Minimum Number of sections that may occur? What is the ideal (target) number of course section? And what is the Maximum Number of Sections? |
|
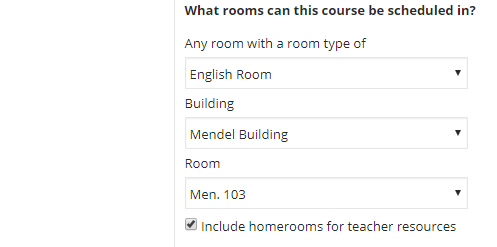
Building and Room PreferenceDetermine which Room Types and Buildings a course should be scheduled in. Include homerooms for teacher resources determines whether homerooms associated with a teacher should be considered as a viable room for fulfilling scheduling requirements. |
|
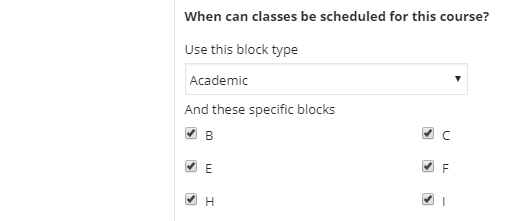
Block PreferenceBlock preference helps to categorize which courses are paired with specific blocks. Because blocks are associated with meeting times in a schedule set, you can use this preference to schedule courses at certain times. Note: Note: If you select blocks preferred blocks, Generate Master Schedule will not schedule sections outside of your selection. Therefore, if a section cannot be scheduled in a preferred block, Generate Master Schedule will not attempt another block. |
|
Tip: Read more about Course Configuration
Teacher Schedules
Core > People Finder > Schedule
|
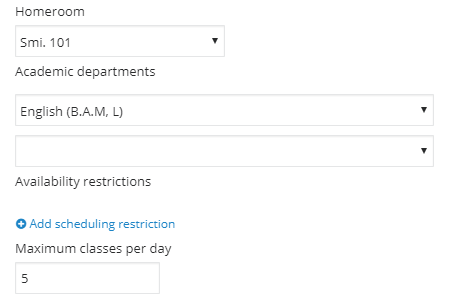
Teacher Schedules refer to parameters set within teachers’ profiles. These parameters include:
These settings are exclusively related to the Scheduling process. Tip: Read more about Profiles |
Offer Courses and Create Sections
The Offer Courses and Create Sections section guides Academic Group Managers through the process of ensuring the various areas in onCampus are configured approproiately.
Offer Courses
Academics > Scheduling > Requests and schedules > Offer course
|
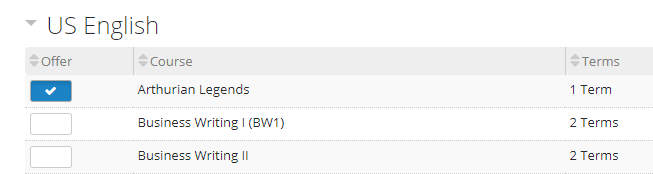
Once a course is configured, it can then be offered. Offered courses are ones that are eligible to become course requests, which in turn can then be scheduled. Blank checkboxes are unoffered, checked boxes are offered, and locked boxes are courses that have had attendance taken. Tip: Read more about Offered courses |
|
Create Sections
Academics > Scheduling > Requests and schedules > Manage classes
Academic Group Managers can create sections for Offered Courses. These sections, in turn, are used in the Scheduling process. Each section equates to an instance of a course offered in a respective block.
Tip: Don't forget to set the filters to the proper school year, level, and term.
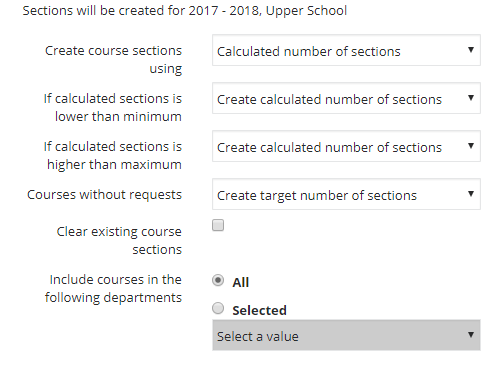
In-Bulk
|
The in-bulk solution looks at the target number of sections. If that value is unavailable, it will divide the number of course requests by the target section size to produce the amount of sections for a course. Create sections in-bulk provides two options: create based solely on target number of sections or calculated. Both settings will require that values are entered on the course record scheduling tab. If you select to create based off of target, then you only need target sections for the course defined. If you select calculated, define the section size values on the course configuration tab. Additionally, with calculated, there are additional field selections when calculated is more or less than the max number, as well as when no course requests are found. Therefore, ensure the min/target/max section options are defined. |
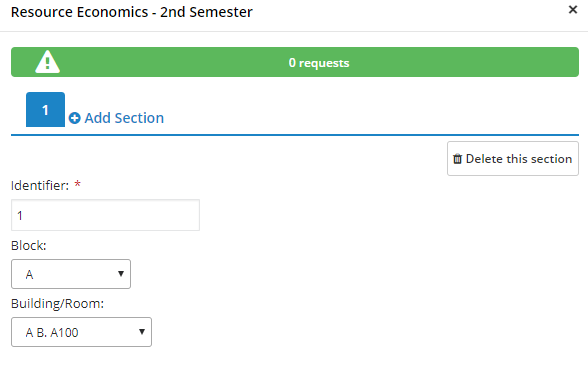
Manual
| Sections can be manually created. Managers can see the total number of requests and recommended section count for each course to assist in this effort. The section count is based on the target size. Managers can add teachers, block, rooms, and students during this step as well. This mode is recommended for smaller schedules or schedules that require precise refinement. |
|
Tip: Read more about Course Sections
Rollover
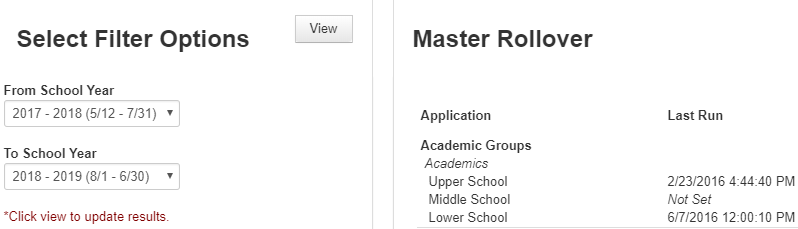
|
Rollover involves taking the courses and sections from current school year and duplicate them into the subsequent year. This mode is ideal for schedules that do not change between years. The Master Rollover is found in Core > System Tools > Master Rollover. |
Structure Your Schedule
In the following instruction, we will focus on creating a schedule that has three variations: students will meet Monday through Friday, but on Mondays they will attend all their courses for a shorter period. On Tuesdays and Thursdays, they will attend a subset of all their classes. On Wednesdays and Fridays, they will attend the remaining subset. This Schedule Set will be used to schedule all Upper School courses.
Create Schedule Sets
Academics > Scheduling > Schedule outline > Schedule sets
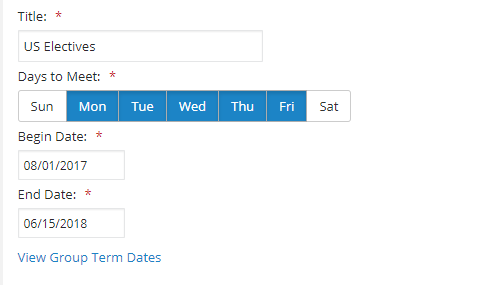
Schedule Sets determine the time and sequence courses occur. Schedule Sets allow for schedules that can alternate on different days, resulting in different courses and course lengths on certain days.
General Information
|
|
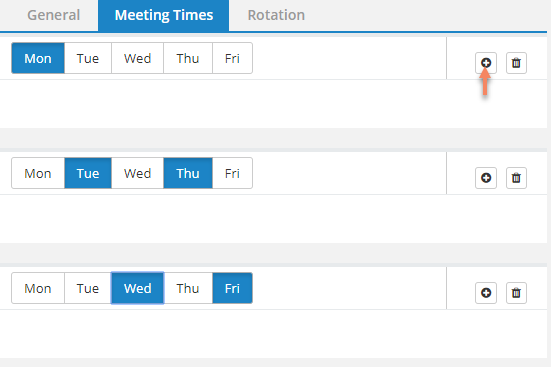
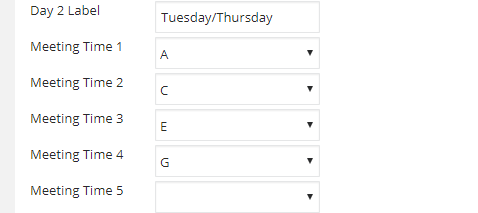
Meeting TimesMeeting Times allow you to specify class start and end times for each calendar day classes are held. Meeting Times correspond with Blocks. For each period that occurs in the day, you will determine in the Rotation tab when it begins and ends. Create a new pattern for each instance of the schedule where blocks will be different. |

|
|
For the example, we’ll have three patterns: one on Monday, one for Tuesday and Thursday, and one for Wednesday and Friday. Monday will have all classes occur, therefore Meeting Times are generally shorter. Tuesday/Thursday and Wednesday/Friday will have the same Meeting Times, but each Meeting Time will have a different block associated with it. |
|
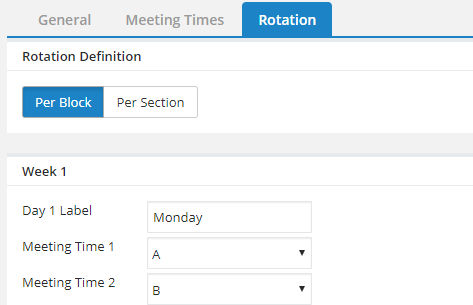
RotationThe Rotation tab lets you associate blocks with Meeting Times. If different blocks occur on different days of the week, then you can specify that here. In addition, you can also specify if even the same blocks occur each day, but at different times throughout the week. The Rotation tab has two buttons for configuring the type of rotation pattern. For our block schedule, because we specified 3 under General > Date Span > Max Days, there are three sets of our Meeting Times that we can associate with the different blocks that occur on those days. Therefore, in this example, we’ll have all our blocks occur on Monday, and then a subset of all our blocks occur on Tuesday/Thursday and Wednesday/Friday for a longer period. |
|
|
|
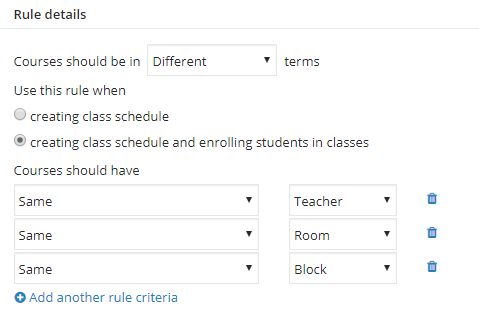
Schedule Rules
Academics > Scheduling > Schedule outline > Schedule rules
|
Schedule rules let you apply additional logic to how certain courses are scheduled. You can create rules that let you:
Tip: Read more about Schedule Sets |
|
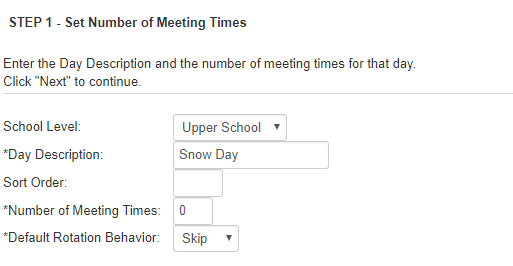
Create Special Days
Academics > Scheduling > Daily schedule calendar > Special days
|
Special Days are variances to a traditional schedule to accommodate for special events. Special Days might include a two-hour delay schedule (due to snow storms), pep rally schedules, midterm and final exam schedules, and so forth. In addition to specifying the exact schedule for each Special Day, you can determine the behavior that occurs after a Special Day. For example, should the day that is being replaced with a Special Day be bumped to the following day, therefore bumping that day? Or should the day be skipped altogether? Note: Special Days cannot be applied to random (Per Section) schedules. Additionally, daily attendance recorded on a Special Day results in no attendance of record being recorded. Tip: Read more about Special Days |
Generate the Master Schedules (GMS)
Once each configuration step has been accomplished, Schedule Managers can begin the process for automating schedule creation.
Note: Scheduling applies only to block schedules. Per section, or random schedules, cannot be used with the following steps. Additionally, Scheduling only applies to academic courses. Advisory groups and activities must be manually scheduled.
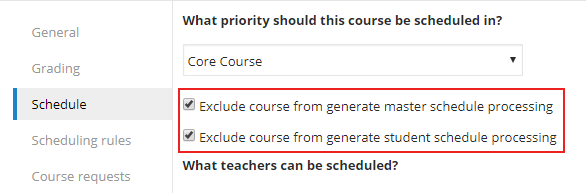
Manual Course Assignment
Academics > Scheduling > Requests and schedules > Set section info
|
Before running Generate Master Schedule, you may decide to manually schedule courses to precisely align them with departmental requirements. If so, you must ensure that Exclude course from generate master schedule processing in the course record for each manually scheduled course is enabled. Tip: It is highly recommended that if it is know who the teacher should be, when the class will be taught and/or what room it will be in, then it should be manually scheduled. |
|
|
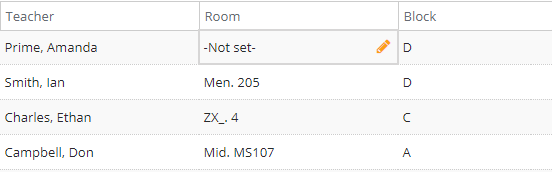
Then, visit Set Section Schedule in onCampus to specify the block, teacher, and room for each manually assigned course. Keep in mind that the block corresponds to the Meeting Time established in the Schedule Set. Note: Scheduling is only for Academic groups. Lunch and Breaks are Activity groups and should be scheduled manually.
|
|
Tip: Read more about Setting Section Information
Conflict Matrix
Academics > Scheduling > Requests and schedules > Overview > Master schedule > More actions > Conflict matrix
|
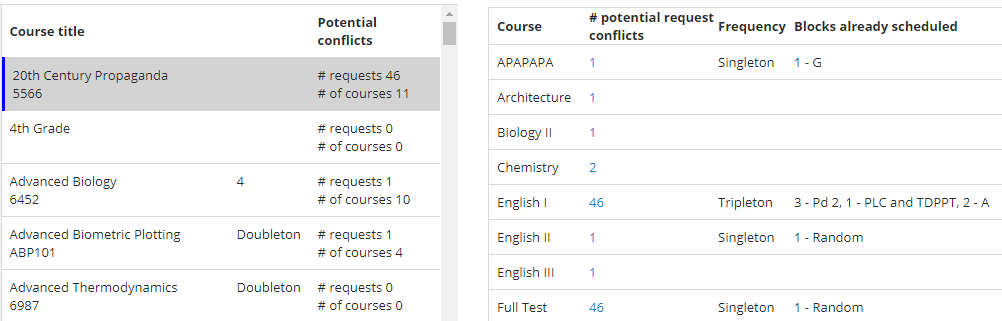
The Conflict Matrix communicates potential problems with relationship between student course requests and the proposed master schedule overall. In the leftmost column, all courses will appear. When selected, in the right column, courses will appear that conflict with the one selected. Students that are requested both courses will appear in the # of potential request conflicts. Due to the conflict, the # of potential request conflicts communicates how many students will be unable to take either course. To resolve this, choose either to create a new section for either course or assign one course to a different block. |
Scheduling Snapshots
Academics > Scheduling > Requests and schedules > Scheduling snapshots
|
Scheduling Snapshots record the blocks, sections, and teachers in an existing master schedule. These snapshots allow you to maintain those specifications when running Generate Master Schedule. Therefore, users can generate new schedules without fear of losing previous Generate Master Schedule run results. |
|
Generate Schedule
Academics > Scheduling > Requests and schedules > Overview > Master schedule > Generate master schedule s
To use Generate Master Schedule for academic courses, navigate to Scheduling > Requests and schedules, find the Master schedule heading, and select Generate master schedule.
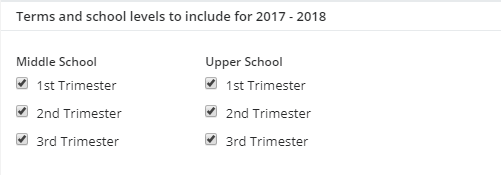
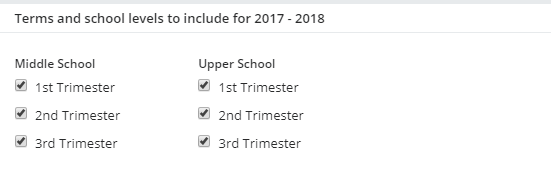
Terms and school levels to includeTerm Settings determine when each user type can create course requests, how long they can submit requests, and how many course requests they must select per term. Each grade level can have different Signup Begin and End dates and different Minimum and Maximum course enrollment counts. Tip: To maximize success, try generating a schedule for one school level and term at a time. |
|
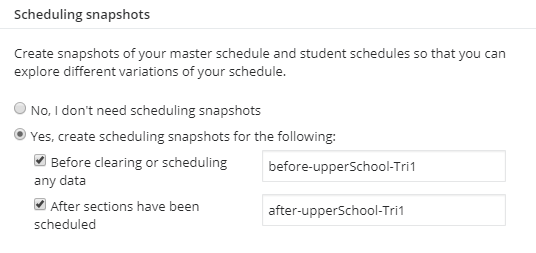
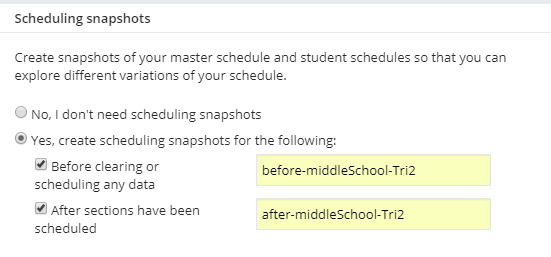
Scheduling snapshotsScheduling snapshots let you restore a master schedule if a subsequent one produced by Generate Master Schedule contains less desirable results. Before clearing or scheduling any data will record a snapshot prior to when Generate Master Schedule is initiated, and After sections have been scheduled will record a snapshot once Generate Master Schedule has completed scheduling sections. Effectively, these settings create a before and after picture of the master schedule. |

|
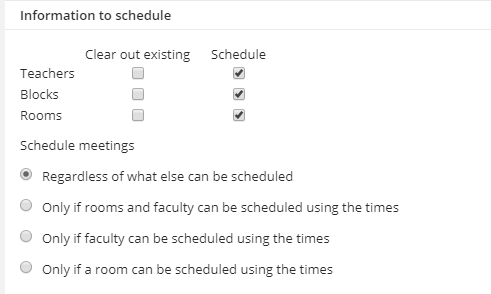
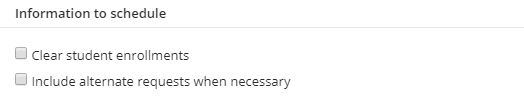
Information to ScheduleInformation to schedule provides additional refinement over scheduling behavior by enforcing specified stipulations. The two columns, clear out existing and schedule, can be used in tandem together or independently. Clear out existing will delete teacher, block, or room data stored in the current master schedule. Schedule will schedule teacher, block, or room data in empty slots in the master schedule. Used together, these settings will erase all data and schedule new data in place of what was deleted. Clear out existing does not apply to scheduling snapshots. Under Schedule meetings, you can further enforce what is scheduled based on defined requirements. Of the options included, Regardless of what else can be scheduled will promise results that are not dependent on preciseness. For example, if a time can be scheduled, but a teacher cannot, then Generate Master Schedule will still attempt to schedule the course with a different teacher. The remaining options let you determine how room and faculty availability should be emphasized in the process. |
|
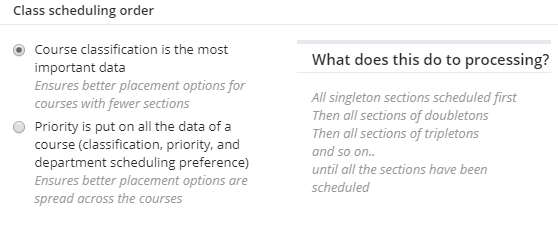
Class scheduling orderClass scheduling order determines the order in which courses are scheduled. Both behavior options revolve around course classification to determine order, but each option puts different priority on how course classification is emphasized. Course classification refers to the number of sections associated with a course. If a course has one section, it is a singleton. If a course has three sections, it is a tripleton. Courses with less sections are often emphasized over ones that have more. Select a scheduling order option that best fits the type of courses you have available. For example, schools with courses that have fewer sections might select Course classification is the most important data while schools that have classes containing many sections that should be scheduled equally might select Priority is put on all the data of a course. |
|
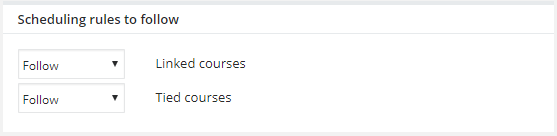
Scheduling rules to followBoth Linked courses and tied courses relate to data entered into individual course records. The difference between Follow and Try is that Follow will only schedule a course if all conditions of a rule can be met. Try will schedule a course if only some of the conditions of a rule can be met. |
|
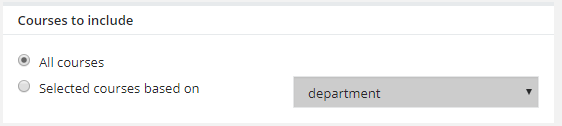
Courses to includeCourses to include will only schedule courses for the departments, grade levels, specific courses, or custom lists within the school level and term you specify. When set to all, Generate Master Schedule will schedule all permissible academic courses. |
|
Tip: Read more about Generate Master Schedule
Review the Master Schedule
Once the Master Schedule has generated, you can view the results to deduce if courses were scheduled as expected. In this stage, you can identify what was not scheduled, and make manual adjustments to the course sections.
Keep in mind the following when reviewing results:
-
80% scheduled is a good benchmark for after GMS runs.
-
The more restrictions in place and the more complex the schedule sets the lower the completion number will be.
-
No two runs will be exactly alike, so ensure the labels of the Scheduling Snapshots are detailed enough to let you know what they are.
View Results
Academics > Scheduling > Requests and schedules > Overview > Master schedule > More actions > View results
|
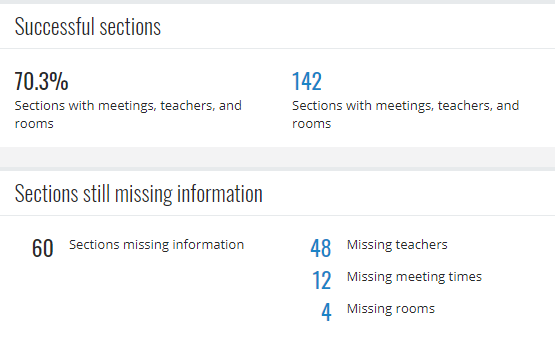
Results from the current master schedule will appear under Master schedule, communicating how many courses were offered, courses without sections, and how many courses are missing teachers, blocks, and rooms. Select any of these communication headers to explore precisely which conflicts arose. Note that these counters will persist even after rectifying issues with missing teachers, blocks, and rooms. The information presented reflects data captured the last time Generate Master Schedule was ran. The information presented does not reflect changes made by the user after Generate Master Schedule runs. |
|
Generate the Student Schedule (GSS)
Academics > Scheduling > Requests and schedule > Overview > Student schedule > Generate student schedule
With your master schedule in place, next you must use Generate Student Schedule to place students in the scheduled sections. Student course requests guided the scheduling process within Generate Master Schedule, making the Generate Student Schedule process complimentary. Using student course request data in conjunction with course record specifications and room capacities, Generate Student Schedule will automate placement of students into course sections.
School level and termSelect which terms and school levels should have schedules generated. If you have already generated and finalized a schedule for a school level, consider unchecking it to avoid overwriting those results when you generate the next master schedule. Tip: To maximize success, try generating a schedule for one school level and term at a time. |
|
Scheduling snapshotScheduling snapshots let you restore a student schedule if a subsequent one produced by Generate Student Schedule contains less desirable results. Before scheduling students will record a snapshot prior to when Generate Student Schedule is initiated, and After sections have been scheduled will record a snapshot once Generate Master Schedule has completed scheduling sections. Effectively, these settings create a before and after picture of the master schedule. |
|
Information to ScheduleWhen Generate Student Schedule runs, you can specify if it should Clear student enrollments data for the active student schedule for the selected school year and term. Include alternate requests when necessary will consider Alternate courses students have requested if their primary course request cannot be fulfilled. |
|
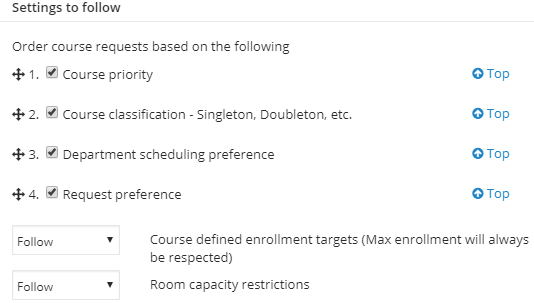
Settings to FollowDetermine how student courses requests are prioritized. Depending on your selections here, students will be scheduled into course requests that meet the priority threshold. For example, if AP courses have a higher course priority than accelerated courses, then a student who requests both will be placed into AP courses first. If two courses have the same course priority, then Generate Student Schedule will look at the second most important factor. |
|
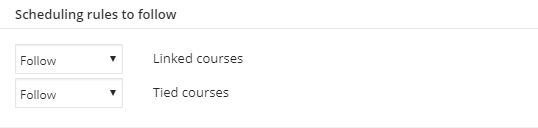
Scheduling rules to followDetermine whether preestablished scheduling rules should impact student schedules. For example, if you require students who take one course (ex. Algebra) to take a complimentary course in the following term (ex. Geometry), then setting Follow for Linked courses would enforce the corresponding rule. Likewise, if you require certain courses to occur at the same time, you would set Follow for Tied courses. An example of a Tied courses might be an English course and a History course. Both, together, might make up an American Studies course, but are taught by individual teachers at the same time in the same room, block, and section. This solution would allow for this scenario to be automated, and for students to be enrolled into both courses accordingly. |
|
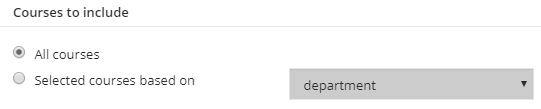
Courses to includeDetermine which courses Generate Student Schedule should schedule students into. The courses included will additionally be dependent on the school level and term you’ve selected in the preceding settings. |
|
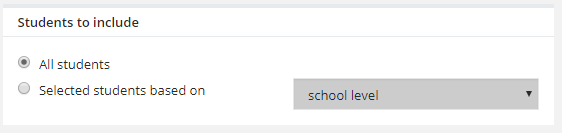
Students to includeStudents to include Select which students among those who submitted course requests in the selected school level and term should be scheduled into courses. |
|
Tip: Read more about Student Schedules
Review the Student Schedule
Review the latest Generate Student Schedule run from the Requests and schedules Overview page by finding the Student schedule tile, selecting More actions, and selecting View results.
The number of conflicts will be illustrated under each section. Select one of the section headings to view a list with the at-conflict results.
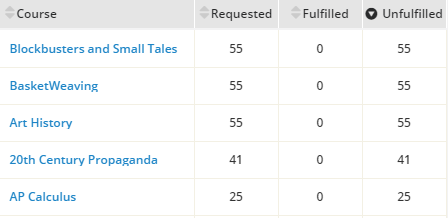
The Fulfillment Matrix
Academics > Scheduling > Requests and schedules > Overview > Course requests > View fulfilled/unfulfilled matrix
|
The Fulfillment Matrix illustrates the number of course requests for a specific course (Requested) and the number of students from that total that have been enrolled. Its purpose allows you to deduce which courses and students require your attention. To get started, look for courses that have counts higher than 0 in the Unfulfilled column. The number in that column corresponds to the number of students that requested the course, but could not be scheduled into it. Click on the course title to view a more in-depth look at each at-conflict student. |
|
View Enrollments
Academics > Scheduling > Requests and schedules > Overview > Student schedule > More actions > View enrollments

|
View enrollments communicates the total statistics for each enrollment count per department per block. Use these enrollment counts to assess enrollment projections or yearly fluctuations in course activity. |
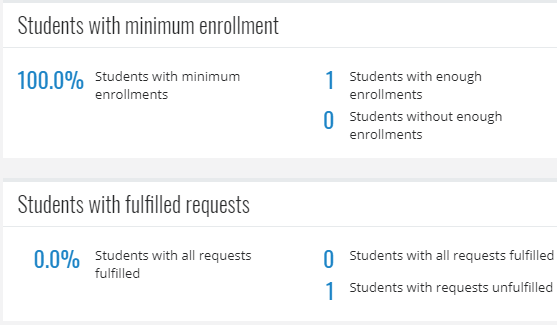
View Results
Academics > Scheduling > Requests and schedules > Overview > Student schedule > More actions > View results
|
For detailed specifics on the most recent Generate Student Schedule session, view results will communicate the fulfillment success rate along with other settings that governed assignment. Tip: Read more about Managing Student Schedules |
|