Get Started with Payment Processing
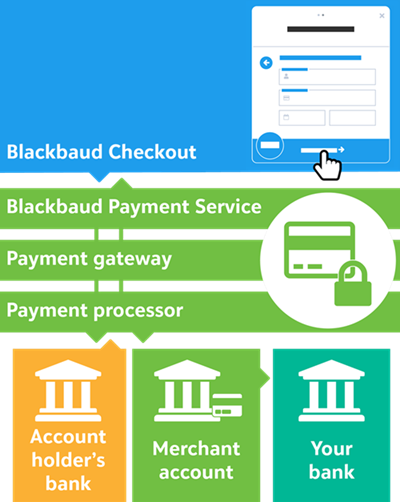
Raiser's Edge NXT processes payments through Blackbaud Checkout, Blackbaud's mobile-responsive payment form. Blackbaud Checkout enables you to process payments as you add gifts, provides your supporters with a simplified online payment experience, and securely captures payment details in compliance with Payment Card Industry (PCI) regulations.
Requirements
To process payments through Blackbaud Checkout, you must have:
-
A Blackbaud Payment Service account to securely collect and store payment info
-
A payment gateway and processor, such as Blackbaud Merchant Services, to send and receive the information
-
An account to collect and deposit the funds into your bank
For information on how to set up and manage your payment accounts, see Payment Processing Overview in Blackbaud Merchant Services Help.
Tip: For access to features such as recurring gift upsell, fee-coverage options, Credit Card Updater, digital wallets, and more, process payments through Blackbaud Merchant Services. For a full list of exclusive features, see Blackbaud Merchant Services for Raiser's Edge NXT. To learn more, check out available online training classes in our Raise More with Blackbaud Merchant Services and Online Donation Forms Learning Path.
Configure payment settings
After you set up required payment accounts, an admin must connect them in the database view.
-
Under Configuration, General, enter your Blackbaud Payment Service credentials and select Test Connection.
-
Under Configuration, Business rules, Merchant accounts, add at least one configuration. Configurations include info about the gateway, access credentials, fraud protection options, currencies, and credit card types that your processor supports.
-
For credit cards, the configuration must process payments through one of the payment gateways Blackbaud Payment Service supports, such as Blackbaud Merchant Services.
-
For direct debits, the configuration must process payments through Blackbaud Merchant Services.
Tip: To simplify payment processing, include a configuration for offline transactions and disable Three-Domain Secure (3DS) processing, Card Security Code (CSC), and Address Verification System (AVS) settings. While these settings help prevent online fraud, they can interrupt processing as you add back office payments in Raiser's Edge NXT.
-
Set up online forms
|
To accept payments through donation If your organization uses Blackbaud Merchant Services, you can also configure forms to accept additional payment methods (such as |
|
Note: Online payments you receive are automatically placed into unapproved batches based on source, date, payment method, and payment configuration. To create records for online payments, from Fundraising, Gift Management, open the batch and select Approve. For more information, see Gift Management.
Donation forms
When you set up donation forms, you choose payment processing settings such as a payment configuration to process gifts, whether to accept additional payment methods, and how to pay transaction fees.
To access Blackbaud Donation Forms, select Online Giving under Blackbaud apps in the solution menu. Then, choose which type of form to create:
-
Optimized Forms require minimal setup and use continually refined data and branding cards to create a streamlined and engaging donor experience. For more information, see Optimized Donation Forms.
-
Standard Forms give you the most control during set up and enable you to include additional fields and style elements, such as divider lines, headers, and gift comments. For more information, see Standard Donation Forms.
Registration forms
If you collect fees or donations through your online registration form, you must configure payment settings.
Note: When an event requires a fee to register, both the event and the registration form must be ready to accept payments. Prior to creating a form, set both a fund and at least one fee on the event. For more information, see Funds and Fees.
-
From Events, open the event record.
-
Under Online registration forms, edit an existing form or create a new one.
-
Under Get started, complete required fields, including payment processing settings:
-
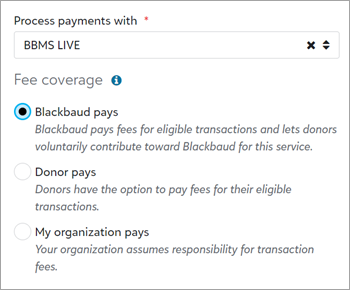
Under Process payments with, choose a payment configuration to process registrations and donations.
-
Under Fee coverage, choose how to pay transaction fees. For more information, see Blackbaud Payment Processing Fees.
-
-
Continue to design and configure your form as needed, then Save.
For more information about the event registration form designer, see Online Registration Forms.
Tip: Before you share your registration form with supporters, you should test it to see what registrants experience. When you're ready to accepts payments through the form, select a live payment configuration. For more information, see Online Test Registrations.
Enable PayPal and Venmo
To provide your supporters with more ways to pay online, integrate your Blackbaud Merchant Services account with PayPal. The integration enables you to accept PayPal for one-time payments through your online forms.
From the Blackbaud Merchant Services Web Portal, connect your Blackbaud Merchant Services and PayPal accounts, then add PayPal as supported payment type. For more information, see Get Started with PayPal in the Blackbaud Merchant Services Help.
Tip: For U.S. accounts, the PayPal integration also supports Venmo payments — no additional setup is required.
Configure retry settings for recurring gifts
If your organization accepts recurring gifts, let Raiser's Edge NXT automatically retry failed payments and help capture revenue that may have otherwise been lost. When enabled, Raiser's Edge NXT automatically retries recurring gift payments that fail due to temporary soft rejections (such as the payment exceeding the card's credit limit).
You can configure how many times failed payments are automatically retried per the gift's schedule.
-
From Control Panel, Settings, select Gift management.
-
Under Recurring gift processing, select Edit.
-
Under Retries allowed for card processing, choose how many times to retry a failed payment attempt. Two is recommended; the maximum allowable is nine.
-
Select Save.
Note: These settings apply to payments that fail due to a temporary soft rejection. Payments that fail due to a hard rejection can be manually retried from the failed payment record. For more information, see Recurring Gift Payment Processing.
Add offline payments
After you set up payment accounts and configure payment settings in the database view, you can start adding offline payments. In Raiser's Edge NXT, you can process credit card
Note: To process direct debit payments, you must have a Blackbaud Merchant Services account.
-
To add gifts one at a time, from Fundraising, Gift management, select Add, Add a single gift. For more information, see Gifts.
Tip: You can also add a single gift from Home or a constituent's record.
-
To add multiple gifts at one time, from Fundraising, Gift management, select Add, Add a batch of gifts. For more information, see Gift Management.
-
To add a registration payment, find the participant from the list of participants on an event record. From the participant's menu, select Add fees/payments. For more information, see Registration Payments.
Whether you add a gift or registration, the steps to process credit card
-
After you enter details such as constituent name and payment amount, under Process with, you must choose a payment configuration.
Note: If there are no payment configurations available, an admin should check settings and credentials in the database view. For more information, see Payment Configuration Troubleshooting.
-
After you choose a configuration, select Credit or debit card
-
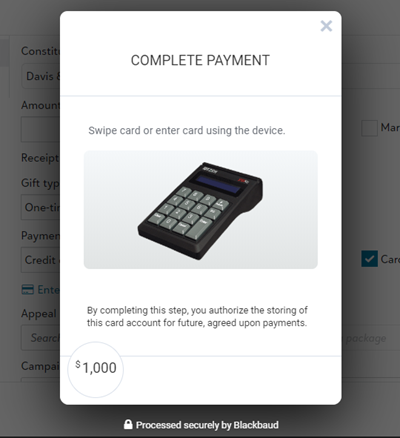
When the Blackbaud Checkout secure payment form appears, enter credit card
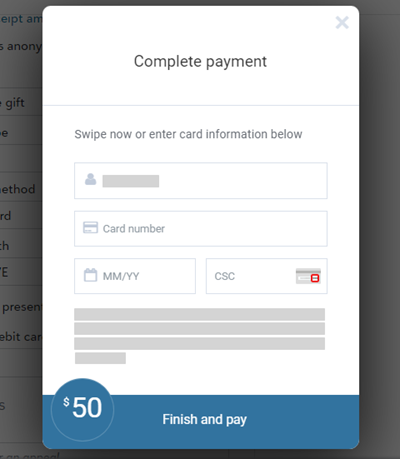
-
After the payment form closes, finish adding other gift or registration details as needed, then Save.
Note: For recurring gifts, payment information you enter is encrypted and securely stored with the Blackbaud Payment Service. Future payments are automatically processed based on the gift's schedule. Payments that succeed are placed in unapproved batches, and you must approve them to create their gift records. For more information, see Recurring Gifts.
Issue refunds
When necessary, you can refund a gift or registration payment from the web view if it was:
-
Added through web view or a Raiser's Edge NXT online form
-
Paid by credit card within the last 365 days
-
Processed through Blackbaud Merchant Services
Refund a gift
From the top of the gift record, select Refund. Under Notes, enter additional details to track the reason for the refund, then select Refund. For more information, see Refund a gift.
Refund a registration payment
From the host participant's record, under Fees and payments, select the payment amount. From the top of the gift record that opens, select Refund. Under Notes, enter additional details to track the reason for the refund, then select Refund. For more information, see Refund a payment.
View updated card details
Credit Card Updater from Blackbaud Merchant Services helps you avoid disruptions in recurring giving by automatically scanning and keeping your supporters' credit card info up to date. Reports can be accessed through the database view or from the Blackbaud Merchant Services Web Portal.
Database view reports
-
In the database view, from Data Health Center, select Update credit cards under Credit Card Updater.
Note: With recent enhancements to Credit Card Updater, credit cards updates are now automated — you no longer need to manually update them. However, you still need to follow these steps to create the control report.
-
To generate a report of the update's results, select Create control report, and choose whether to preview or print the report.
-
To generate constituent and gift queries based on any updated credit cards, select Create output queries.
Tip: We recommend you create output queries to help verify changes or reach out to constituents whose cards return invalid information or closed accounts. In Query, these queries appear as Credit Card Updater — Constituents Updated and Credit Card Updater — Gifts Updated.
Note: The output queries exclude information updated in batches.
-
To automatically track details about updated credit cards on records of their gifts and constituents, select Add attributes to updated records.
-
Select Update Credit Cards.
Web portal reports
To view all updated cards for a Blackbaud Merchant Services account, sign in to the Blackbaud Merchant Services Web Portal, then select Reports, Credit Card Updater. For more information, see Credit Card Updater.
Enable optional point-to-point encryption (P2PE)
For additional security, Blackbaud Merchant Services partners with Bluefin® Payment Systems to offer a PCI-validated P2PE solution. To enable P2PE, you must have a Bluefin SREDKey device and a Blackbaud Merchant Services account.
To get started, visit P2PE Assistance and Resources. and sign up for the solution. Then enable P2PE in Raiser's Edge NXT:
-
From Control Panel, Settings, select Gift management.
-
Under Point-to-point encryption, select Edit.
-
Enable point-to-point encryption, then Save.
After P2PE is enabled, you must swipe or key in card details through your P2PE device each time you add a credit card payment in the web view.